












📑 Table of Contents
Introduction
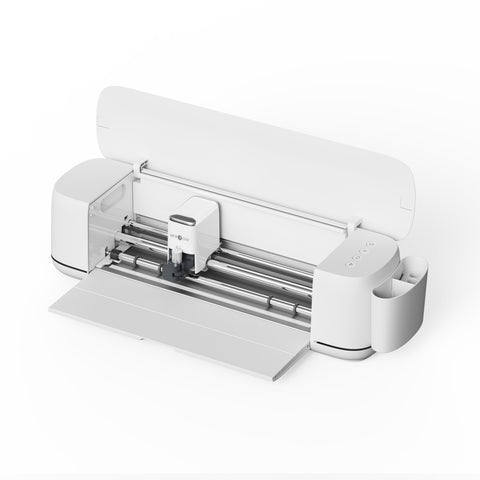
In this lesson, we'll show you how to cut compatible matless materials with the HTVRONT C2 Vinyl Cutter. Rather than placing the material on a cutting mat, you feed it directly into the machine from a roll holder. This can reduce preparation time for longer designs, provided the material is specifically suitable for matless cutting on the C2.
For this demonstration, we're using a roll of matless glitter heat transfer vinyl (HTV). We'll take you through loading the roll, preparing and cutting the design, removing the excess vinyl and applying the finished design to a garment.
If you've just unpacked your machine, start with the C2 unboxing and setup guide. For help connecting the machine and preparing your first project, read how to use the C2 Vinyl Cutter for the first time before working through this lesson.
Here's what we'll cover:
- Set up the machine and load the material
- Create your design
- Choose the cutting settings
- Start cutting
- Weed and press your design
Step 1: Set Up the Machine and Load the Material
Press the Power button to switch on the machine. Fit the roll holder to the front of the C2.

Place the roll on the holder.

Pull out enough vinyl to reach the loading slot and align both edges with the machine's guides. Make sure the leading edge is straight and the roll can turn freely. For the HTV used here, load the material with the carrier sheet facing downwards, following the material's instructions.

Press Load to feed the material into the machine.
Check compatibility before loading. A roll of vinyl is not automatically suitable for matless cutting. Check that the material, its width and its backing are supported for matless use on the C2. Selecting a matless setting in IdeaStudio does not make an unsuitable material compatible.
Step 2: Create Your Design
Open HTVRONT IdeaStudio and connect your C2 Cutting Machine. Click the + button to start a new project.
On the right-hand side of the canvas, select Matless Materials and enter the appropriate material size.

Upload your own design or choose one from the Library. Adjust its size and position so that it fits within the available cutting area.

If your design contains several layers, click Layers on the right-hand side of the screen and select the colour you want to cut.

Once you're happy with your selection, click Make.

Step 3: Choose the Cutting Settings
Select the colour group you'd like to cut. Under Operation, check that Cut is selected.

Under Materials, select Matless Glitter Heat Transfer Vinyl for the material used in this demonstration. IdeaStudio will apply the recommended cutting settings for that preset.

As we're cutting HTV, mirror the design before cutting. This is particularly important for lettering, which would otherwise appear back to front on the finished garment.

📌 Matless cutting or a cutting mat? Use the matless workflow only with materials confirmed as compatible with the C2. Standard adhesive vinyl for decals, and HTV that is not intended for matless use, should be prepared on a cutting mat according to the machine and material instructions. Choose the preset that matches the material you're actually using.
If you're trying a new material, make a small test cut first and check that the excess vinyl weeds away cleanly without cutting through the carrier sheet. Once you've checked the settings and mirrored the design, click Add to Task.
Step 4: Start Cutting
Before starting, check that the material is loaded straight and that there is enough clear space in front of and behind the machine for it to move freely. Make sure the roll can unwind without snagging, then click Start.

The machine will feed the material through and cut your design. Allow it to move freely; do not pull the vinyl or restrict the roll while the task is running.

Wait until cutting has finished and the machine has stopped. Use the built-in cutter on the roll holder to separate the cut section from the roll.

Remove the roll holder, then press Load/Unload and take out the cut material.

Step 5: Weed and Press Your Design
Use a weeding tool to remove the excess vinyl, leaving only your design on the carrier sheet. Remember to remove the small unwanted pieces inside letters and shapes as well.

Check that your garment is suitable for the chosen HTV and pressing temperature. Position the design on the fabric with the carrier sheet facing upwards and the adhesive side against the garment.

Apply the design using a heat press, following the temperature, time, pressure and protective-cover instructions for your particular HTV. The UK heat press settings guide provides additional guidance, but the instructions supplied with your material should take priority.
Peel away the carrier sheet at the stage specified by the manufacturer — hot, warm or cold, depending on the product. Do not assume that all glitter HTV requires the same peel method.
Your personalised garment is now complete. Follow the vinyl's care instructions, including the recommended waiting time before the first wash.
New to HTV? Read what heat transfer vinyl is and how it works for an introduction to the material. For a machine-specific pressing example, follow the H10 T-shirt press tutorial.
Video Tutorial
Watch the full matless cutting and pressing process in the 2-minute 53-second tutorial below.
Conclusion
Matless cutting removes the need to prepare a cutting mat, but the choice of material still matters. Use a roll confirmed as compatible with the C2, load it straight and select the matching matless preset in IdeaStudio. For HTV, remember to mirror the design before cutting, then weed and press it according to the material's instructions.
Once you're comfortable with this process, you can explore other C2 techniques. The deep-cutting lesson covers faux leather, while scoring and foil transfer offer different ways to finish greetings cards and paper projects. Each technique requires its own tools, materials and settings, so work through the relevant lesson before changing your setup.
Frequently Asked Questions
Here are a few common questions about trying matless cutting for the first time.
What are matless materials, and why don't they need a cutting mat?
Matless materials are designed to feed directly through a compatible cutting machine without being attached to a mat. Their backing and dimensions provide the support and grip needed for this feeding method. Check that your chosen material is specifically suitable for the C2; a product described as a smart or matless material for another machine is not automatically compatible.
Can I use ordinary HTV in matless mode?
Only use HTV that is confirmed as suitable for matless cutting on the C2. If your vinyl is not intended for that purpose, use a cutting mat and the appropriate material setting. Choosing a matless preset in IdeaStudio does not change the properties of the vinyl or its backing.
How do I keep the material straight when loading it from the roll?
Align both edges with the loading guides before pressing Load. Check that the leading edge is straight, the roll sits correctly on the holder and the material can unwind freely. If it begins to feed at an angle, stop the task safely and reload it rather than trying to pull it straight while the machine is moving.
What is the roll holder's built-in cutter for?
It separates the finished cut section from the rest of the roll. Wait until the machine has finished cutting and stopped, then use the holder's cutter to trim across the material as shown in the tutorial.
Why do I need to mirror the design for matless HTV?
Because you are still cutting HTV from the adhesive side, with the carrier sheet underneath. The design is turned over when placed on the garment, so it needs to be mirrored to appear the right way round after pressing. Cutting without a mat does not change this requirement.
Should I peel the carrier sheet while the vinyl is hot or cold?
Follow the instructions for the exact HTV you're using. Some products require a hot peel, others a warm or cold peel. The matless cutting method does not determine the peel temperature, and glitter finishes do not all use the same pressing or peeling instructions.
Keep Learning
Explore more C2 techniques, brush up on HTV basics or follow a machine-specific pressing tutorial for your next project.
Vinyl Cutter Tutorials
- C2 Vinyl Cutter Unboxing: What's in the Box & Setup Check the box contents and get your machine ready for its first project.
- How to Use the C2 Vinyl Cutter for the First Time Work through the basic setup and first-use steps.
- Vinyl Cutter Lesson 1: Deep Cutting Faux Leather on C2 Explore the tools and settings used for cutting faux leather.
- Vinyl Cutter Lesson 2: Scoring Setup & Folding Workflow Create fold lines for greetings cards and other paper projects.
- Vinyl Cutter Lesson 3: Foil Transfer Add metallic details to card using the foil transfer tool.
HTV Basics & Heat Press Settings
- What Is Heat Transfer Vinyl? Get to know HTV before starting your next fabric project.
- Heat Press Settings for HTV, DTF & Sublimation (UK Guide) Find guidance on temperature, time and pressure for different transfer methods.
Heat Press Tutorials
- H10 T-Shirt Press Tutorial: Settings, Steps & Tips Follow the H10 pressing process for flat garment projects.
- How to Use the A300 Auto Hat Heat Press: Step-by-Step Learn how to set up the A300 and press suitable hats.
- How to Sublimate Phone Cases on the H17 Heat Press Explore the separate sublimation process for compatible phone cases.
- A200 Tumbler Heat Press Guide: Handle Tumbler Workflow Follow the A200 tutorial for suitable tumblers with handles.
- A100 Auto Multi Heat Press Guide: Flat Plate Workflow Use the A100 flat plate for suitable flat transfer projects.
- A100 Multi Heat Press Guide: Hat Plate Workflow Work through the hat plate setup and pressing steps.
- A100 Multi Heat Press Guide: Tumbler Plate Workflow Learn how to use the A100 tumbler plate with compatible blanks.

Leave a comment
All comments are moderated before being published.
This site is protected by hCaptcha and the hCaptcha Privacy Policy and Terms of Service apply.