No matter whether you're an experienced crafter or a novice who just pops out the thought of creating things on your own, it seems attractive to add some gradient metallic sheen to the final results. And one of the craft materials that can make the brilliant idea come true is Holographic Vinyl!
What is Holographic Vinyl?
Holographic vinyl is a type of vinyl that has a holographic or iridescent finish, featuring a unique and eye-catching look. It's becoming increasingly popular with the growing and prosperous handicraft activities. And that's all because such a visual effect can always make you stand out in the crowds.
Whether you're a craft lover hoping to retouch your projects with some sparkle or a business looking to create attention-grabbing signage or promotional materials, holographic vinyl won't let your down.
Today, in this ultimate guide, I will cover everything you need to know about holographic vinyl, from the two primary types of vinyl available and the difference between them to the different applications and techniques you will apply to different types and create stunning designs.
Types of Holographic Vinyl
Various types of holographic vinyl are available, each with its own properties and suitability for different applications. But fundamentally, they can be classified into two main types: Holographic Heat Transfer Vinyl and Holographic Adhesive Vinyl. Let's view more detailed information below (I, here, will take my favorite craft brand, HTVRONT, as a reference for you):
This type of holographic vinyl is applied to fabric with a technique involving heat and pressure, known as heat transfer. This means it's perfect for creating custom apparel and personalized things in your wardrobe, like hats, bags, socks, trousers, or even shoes.
Usually, this heating method enables the holographic vinyl image to stick much firmer than others since it actually uses heat to melt the holographic vinyl and transfer the whole image to the fabric surface. Like HTVRONT Crystal Holographic Heat Transfer Vinyl, as long as you choose the right method to do the laundry, it will still shine brilliantly and look glorious even after repeated wash circles.
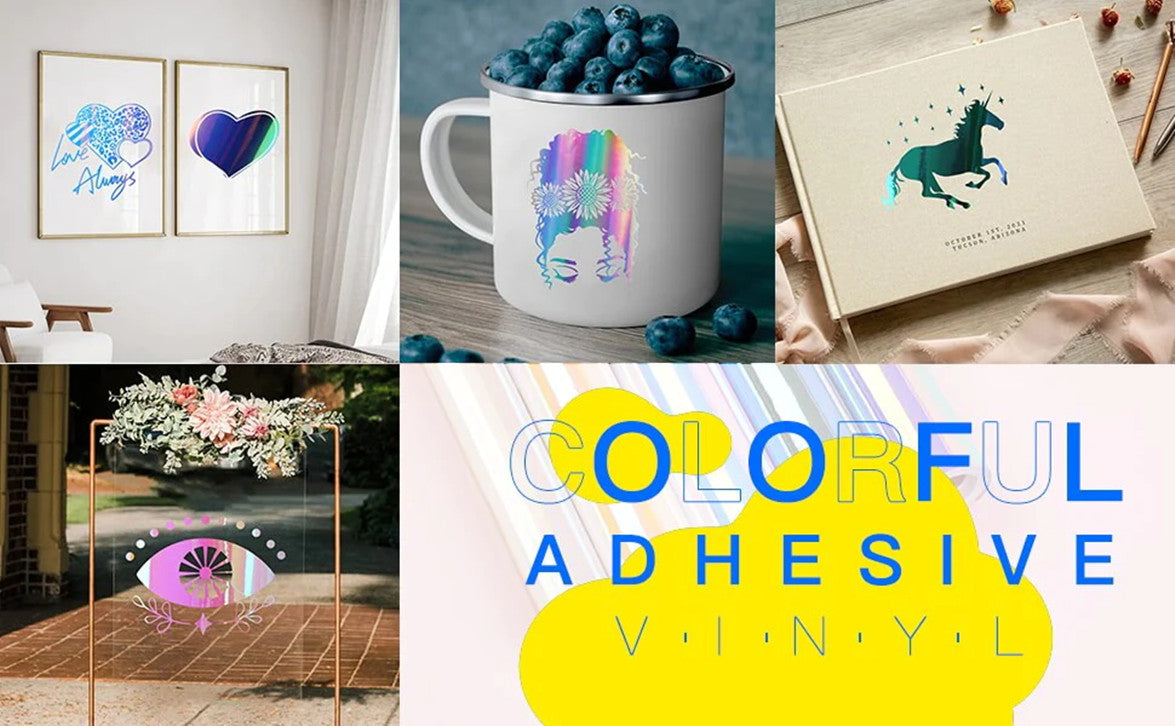
Unlike heat transfer vinyl, this type of vinyl has a strong adhesive backing that can adhere firmly to surfaces and last for a long time. This means no high temperature is needed for the whole method; you need to peel it off and use it to dot whatever you like!
Holographic permanent adhesive vinyl allows you to demonstrate your fantastic idea on other objects like cups, mugs, tumblers, mirrors, notebooks, etc. It's like stickers that can be applied to smooth and flat surfaces. And HTVRONT comes with both rolls and sheets for you to choose from, suitable for your massive or single designs without wasting materials.
Holographic Adhesive Vinyl Roll
https://www.htvront.co.uk/products/htvront-holographic-sparkle-adhesive-vinyl-roll-rose-gold-12-x-10-ft-permanent-glitter-vinyl-for-cricut-silhouette-cameo-cutters-for-craft-on-cups-3-colors-available
Holographic Adhesive Vinyl Sheet
https://www.htvront.co.uk/products/htvront-holographic-vinyl-permanent-12-x-12-12-pack-holographic-vinyl-sheets-for-cricut-and-other-craft-cutters
How to Use Holographic Vinyl?
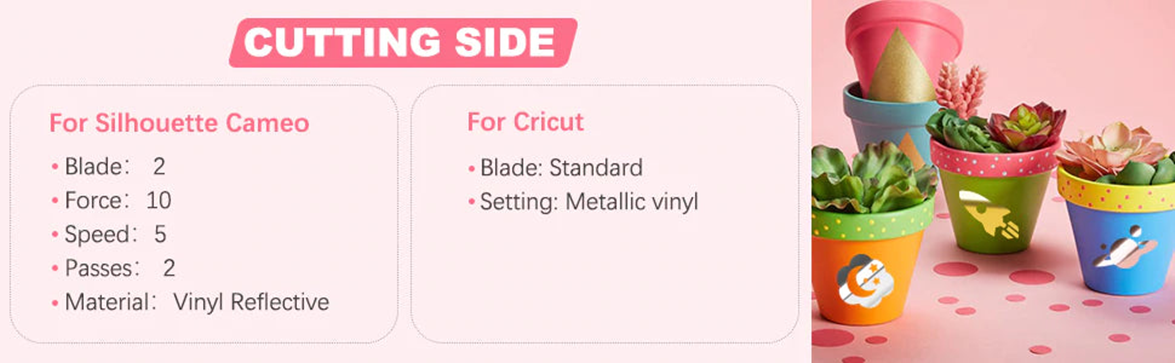
To apply the Holographic Vinyl, you will need this cutting guide below as your first reference. But note to make a sample test before practically cutting your desired images since cutting settings vary from Machine to brand.
Cutting Settings of Holographic Vinyl
For Holographic adhesive vinyl, you just need to prepare the following items to complete the process:
1. Holographic Adhesive Vinyl
2. Cutting Mat
3. Transfer Tape
4. Vinyl Weeding Tools
5. Scraper
6. Cutting Machine
Typically, you must make an ideal design on your editing software first and send the cutting code to the cutting machine.
Place your holographic vinyl on the cutting mat, load them into the Machine, and let the cut begin.
Use your weeding tool to get rid of the negative parts of your design and apply the transfer tape. Cover it over your intact design, starting from the center and moving out to the edges. You'd better use a scraper to do the move to avoid bubbles.
Once the image gets onto your transfer tape completely, stick it on your desired object using the same method as the scraper. Do it slowly and gently; good results always ask for careful practice.
Peel off the transfer tape, and your pretty design is there! Pretty Easy! Huh!
As for Holographic Heat Transfer Vinyl, you will need the following:
1. Holographic Heat Transfer Vinyl
2. Cutting Mat
3. Heat-resistant Tape
4. Teflon Sheet
5. Vinyl Weeding Tools
6. Cutting Machine
7. Heat press machine
The difference between making a design for holographic HTV and adhesive vinyl is the former asks for a reversed image on the computer. Remember to mirror the image before cutting it out.
Lay the protective film side down to the cutting mat and load them into the cutting machine. Let the Machine do its job.
Next, remove the excess parts and leave the image intact.
Place the image on a shirt in the spot where you want. Fix the vinyl image with heat-resistant tape and cover a piece of Teflon sheet on top.
Preheat the heat press to 320℉. When the machine reaches the set temperature, apply it to the vinyl image and the shirt. Press for 15 to 20 seconds.
After the temperature drops, peel off the protective film and enjoy your personalized shirt!
Have fun with all the shiny sheen this holographic vinyl brings to you!


 Grab a Free Gift Now!
![[All in one]HTVRONT Auto Heat Press 2+Tumbler Heat Press+Hat Heat Press+All in One Bundle(Multicolor HTV Roll*20+150 sheets Sublimation Paper A4+Sublimation HTV Roll+PUFF HTV*8+Tumbler Blanks*4+Canvas Bags*6+Cap*2+Tools≥237 £)](http://www.htvront.co.uk/cdn/shop/files/6_c40f6148-efa4-4b45-9252-16379cb1b6a0_355x.jpg?v=1760948331)
![[Christmas Bundle] HTVRONT Auto Heat Press 2 + Christmas Essential Bundle](http://www.htvront.co.uk/cdn/shop/files/20251128-151503_355x.png?v=1764314958)

![[New Customers Exclusive]Auto Tumbler Heat Press Machine+New Customers Bundle](http://www.htvront.co.uk/cdn/shop/files/2_359f06af-bf7b-453f-88d4-a9bcb73362d7_355x.jpg?v=1760947995)
![[Machine bundle]HTVRONT Auto Heat Press 2-15"x15" +Tumbler Heat Press](http://www.htvront.co.uk/cdn/shop/files/0_984c4f00-22f1-4379-a8c1-9efc839e8e16_355x.jpg?v=1760948374)